Time: 90 minutes
Material: skeleton, booklet, scissor, glue,
Space: classroom
Focus: Embodiment, the nature and structure of the human body spine.
In any Posture Respecting the Natural Curves of the Spine is Fundamental
Theme: Gravity, human body skeleton , human body spine
Definitions
References
- The basic structure and function of the skeleton.
The skeleton, made from bone, supports, and protects many delicate parts of the body. The main constitution of the spine- its vertebra’s shape, its disc’s acting as cushion, and its curves – allow flexibility of the human spine to adapt to various postures.
The segments such as the head, the thoracic cage, and the pelvis play a key role in the curve of the spine. Therefore, the posture of any segment of the human body impacts the curves of the spine.
- Interconnectedness within the human body
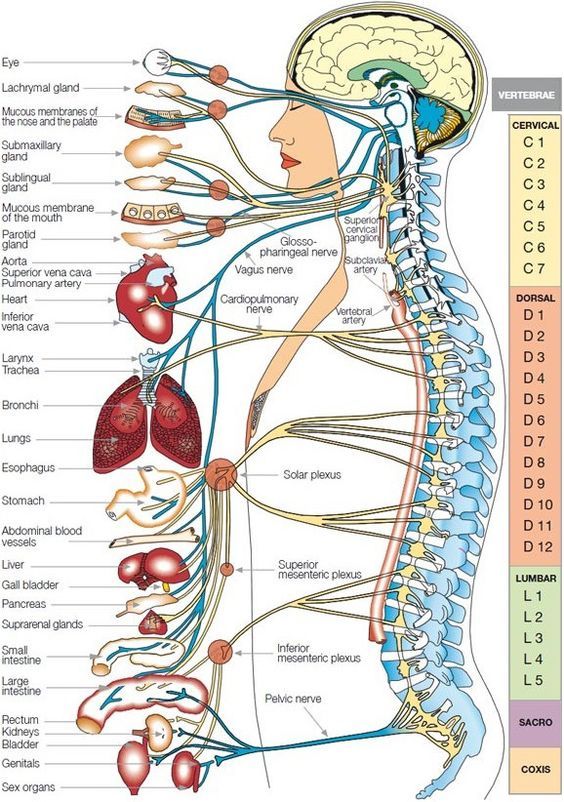
Systems and organs are connected. For instance, spinal nerves connect to the brain through the spinal cord inside the backbone.
- The effects of balanced and unbalanced forces
In various positions, the curves of the human spine changes to counteract the different acting forces. The way a skeleton is structured around the line of gravity influences the way it functions. Conversely, a skeleton’s shape impacts the way of walking, sitting, standing, and performing other activities. Furthermore, the way a body functions, impacts the various curves taken by a skeleton.
- For the human body to function properly, it is fundamental for it to respect the structure of the spine. Respecting its structure means maintaining the curves of the spine aligned with the line of gravity.
- The gravity line passes through the base of support if balance is adequate.
Step 1
Entrance Ticket
Ask students to share their questions from last class.
Step 2
The Primates and Human Body Mime
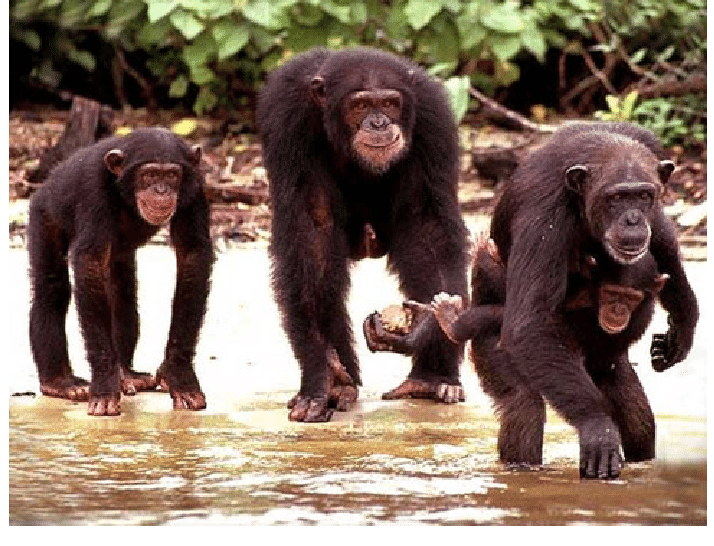
Show the pictures of the primates and ask the students:
Ask students to demonstrate primates’ walk in the classroom. Ask them to mime primates’ activities.
Make them switch to human walk miming one specific human activity.
Show on the board pictures of:
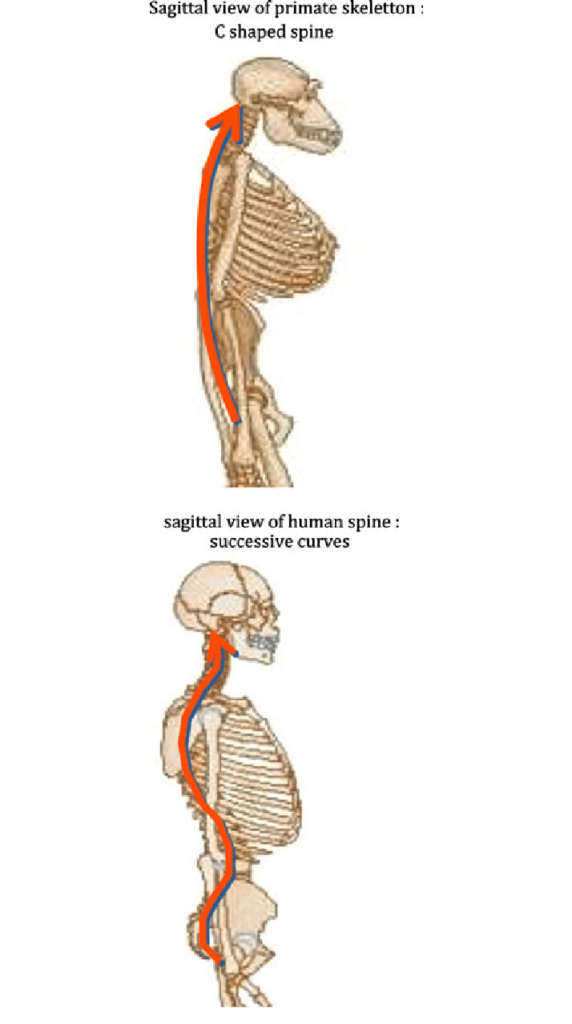
– Sagittal view of primate skeleton C-shaped spine.
– Sagittal view of human spine successive curves. (Appendix 2).
Mime how the primates use their arms to counterbalance while walking.
Refer to the primate’s spine drawing to compare the C-shaped curve of the primate spine and the 5 curves of the human spine both organized around the line of gravity.
Step 3
The Human Body skeleton
Name the skeleton, and ask students:
Let them brainstorm using their chrome book. After 5 minutes, each group shares their findings to the class. A Mentimeter poll could be used to synthetize the results on the board.
Definitions
Step 4
The Human Body Spine
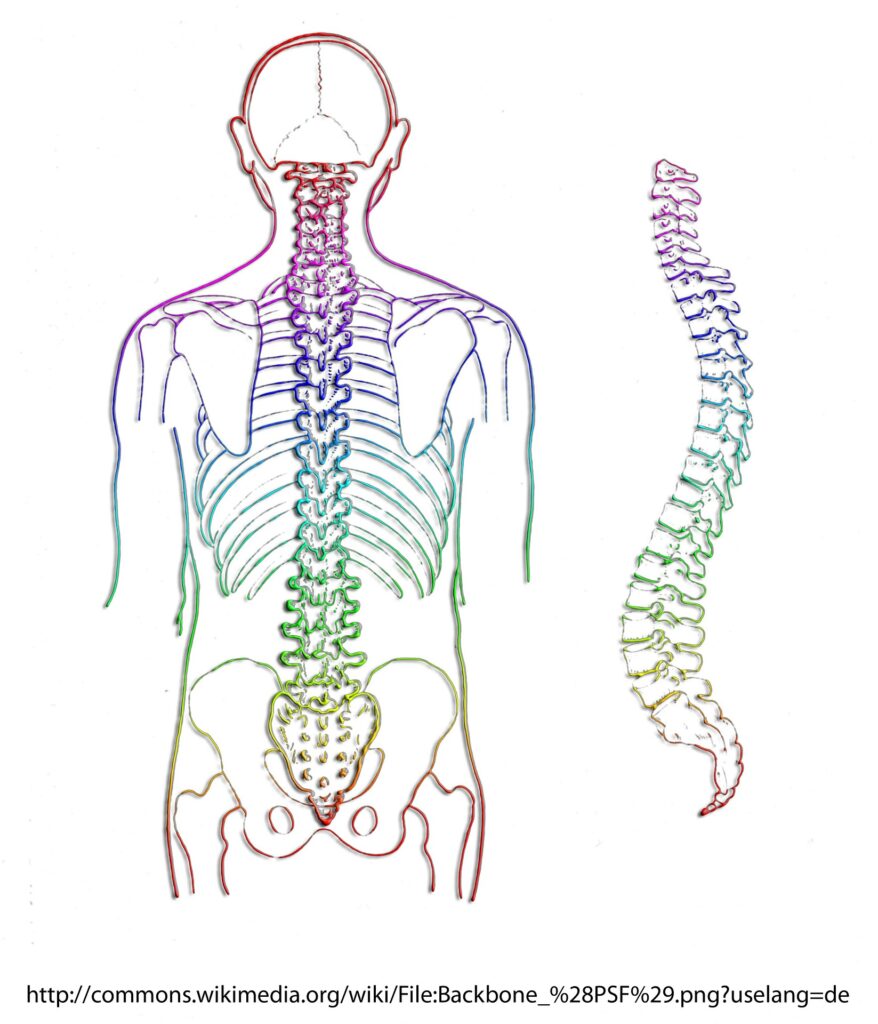
Present the different sections of the spine: the cervical, the thoracic, the lumbar, the sacrum and the coccyx curve. Show on the board the different curves using: What Are The 5 Sections Of The Spine? Spinal Column Anatomy | BC Chiropractic Association.
Place the skeleton in multiple positions and demonstrate the flexibility of the spine in the human body in relation to its structure. This flexibility is connected to the spinal curves.
Pose the question and let them brainstorm:
Present the structure of the spine: the vertebrae, the discs, the muscles, the ligaments and the tendons between vertebrae. This structure offers several advantages, such as the complete freedom of the upper limbs to perform tasks or to carry things.
Refer to the ribs as a protective structure for some organs such as the lungs and the heart. The ribcage also serves as a supportive structure for the ‘’bags’’ and muscles which are surrounding the trunk and are attached to the ribs. It also supports the upper limb.
Let them brainstorm.
Make them think of animals with different bone structures. For instance, animals with a spine and just one cavity: a head (reptile); a spine with only a few bone; a spine with only ribcage but no pelvis and finally animals with a spine and three cavities.
Invite the students to close their eyes and visualize their spine.
Step 5
Spines and Gravity
Have them draw on the board the direction of the spine of the animal, in the example they selected earlier when these animals move in their daily life.
Students also draw the line of gravity on thespine of the human body.
The gravity line passes through the base of support if balance is adequate.
Step 6
The Spine and Other Systems
Present the nervous and circulatory systems surrounding each vertebra.
Explain the connectedness, showing that any nerve line coming out of each vertebra is connected to one or more organs. This nervous system is reaching the brain through the spinal cord to transmit information.
Refer to the analogy of a tree having branches and roots to visualize the nervous system of the human body. The circulation of information in this system is going in various directions: through the trunk, the spine, and from and toward the brain, from and toward any other system.
Organs connected to the spine
Step 7
Mister Wolf Game
Explain the rules of the game the students will play, which is similar to ‘’Grandmother’s footsteps’’, ‘’Peep behind the curtain’’ or, ‘’Mister wolf’’. While looking at the board, the teacher counts the rhythm by beating on the board and singing a sentence; simultaneously, the students are required to take different positions. After stopping to hit the board, the teacher turns around, and everybody should stay motionless for a few seconds.
Gives these instructions to the students:
- Change position each time I stop beating on the board and I turn around. The different positions you can choose from are standing, sitting on your chair, sitting on the ground, or lying down on the floor.
- Change your head position while looking in different directions.
- Change the position of your arms by placing them by your side, in front of or above yourself.
Having played this game for 2 minutes, invite the students to reflect on these questions:
Demonstrate different changing positions using the skeleton.
Start the game over again.
Step 8
The Ullman Video and Stick Figures
Show the students the Ullman animation video.
Ask them to pair up and give them the stick figure handout sheet.
Watch the Ullman video again with the sequences.
Run the video again, pausing at each of the three major skeleton’s position taken. Sitting forward, sitting straight, and sitting slouched back.
Ask them to cut the different curve segments from the handout sheet and to paste them to create a stick figure representing the position of the spine in each of the postures taken by the skeleton in the video.
Ask them to draw for each sequence, the line of gravity on the side and in the middle of each stick figure they draw.
Depending on their previous understanding, have them draw the circle representing the base of support and the centre of gravity.
Step 9
The Human Spine Curves and Posture
Pose this question:
Guide them towards the reply:
- Because of the posture taken by the skeleton.
Define the posture as a position taken by the human body, and as an attitude taken by a person. This attitude can be demonstrated at different level:- mental, emotional, and physical. In this latter example, a posture taken through physical attitude is an expression of your physical identity.
Depending on the student’s previous knowledge, the notion of body-image can also be brought into the discussion.
- Because of gravity.
Discuss The balance system of the body which accommodates gravitational forces by changing its inner shape in order to stay balanced. When the head is tilted forward looking at the ground, it pulls on the spine which has to change the shape of its curves to counterbalance the gravitational force.
Pose this question:
Definitions
Step 10
Exit Ticket
Ask them to observe their surroundings. Make them notice their family members’ positions at different places such as in their cars, or/and at home.
Invite them to visualize the different curve their spine take.
What lesson do you want to explore next?
